Kristin’s Preblocked gauge:
US 10 stockinette: 16 st and 22 rows in 4”
US 9 Rib: 17 st and 22 rows in 4”
Kristin’s Post-Blocked Gauge:
US 10 stockinette: 15 st and 22 rows in 4”
US 9 rib: 15 st and 23 rows in 4”
Don’t go with a larger needle even though your gauge is off - this fabric is as open as you want it to be… Instead make the second size and the end result should be somewhere between size 1 and size 2.
20-11-2018
72 grams for sleeve 1 (36 g per skein as yarn is held double). Total 144g for sleeves
I’ll have 78g left to finish the neck, upper body and button bands.
My body to underarm is 9” and this took 127g.
I’m seriously cutting this close. In fact, may need to come up with some alternative for button bands (or maybe leave out a large portion of the neck depth.
20-11-2018
Likelihood I’ll have enough yarn is really slim so I’m going to have to go off-road on the button band and collar, I suspect. I have a couple of other sport options in the stash but one may not have enough yardage. I could also do a swatch of fingering held triple (God help me) to give me more options to choose from.
Not only don’t I want to buy more yarn but I’ve discovered, the hard way, that Quince dye lots are not consistent in any way so don’t want to spend time, money and effort trying to duplicate the Chickadee I’m using.
27-11-2018
So, I totally neglected to read this instruction (at the end of the Body instructions) which is entirely unlike me:
Moving sts around needle without knitting, and
removing markers when you encounter them, sl
3 (3, 4, 4, 5, 6, 6) sts each side of each marker
to waste yarn for underarms. 6 (6, 8, 8, 10, 12,
12) sts on hold for each underarm; 118 (130, 138,
154, 166, 174, 186) sts rem with 30 (33, 35, 39,
42, 44, 47) sts for each front and 58 (64, 68, 76,
82, 86, 92) sts for back.
I figured it out intuitively, but not till I had to rip back half the sleeve/body join-row.
01-12-2018
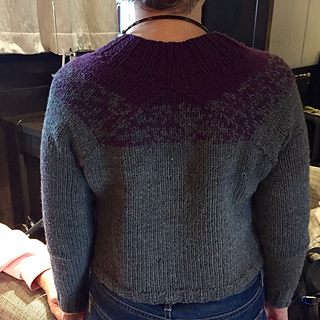
Opted to marl the grey (before it ran out and about half way through constructing the yoke) by swapping out one of the 2 strands of grey DK with 2 strands of plum-coloured fingering (Heritage). This worked for ~13R till the one strand of grey ran out and then I just did 3 strands of the Heritage from there on in, on the US 9 needle, to complete the button bands and the collar. Hopefully this will look integrated and not like a fix.
01-12-2018
I’m considering doing short rows on the back neck (if I can figure this out without any difficulty) - UPDATE - I couldn’t, so this didn’t happen - AND also raising the neck line (by decreasing to 60 stitches instead of 70, during step 3 (following decrease instructions for C/D to get one to 70 stitches). I’ll also make the neck less tall, as I want it to seem less “alien creature”. The latter, I have done. At 60st before casting on the neck.
01-12-2018
Thanks to shofielen: used http://www.worldknits.com/knitting-calculators/ to decrease on the RS K2tog-heavy row that gets one from 87 st (2nd size) to 70 st - or 60 st if you are me. FWIW, this row works like this:
Start on Step 3: Follow instructions for your size as foll:
Second, third, fourth and seventh sizes only:
Next row (WS): Lld, rm, p to marker, rm,
p2tog, rm, p to marker, rm, p2tog. 3 sts dec.- do this as per instructed.
Then, on next row, instead of what’s suggested to get to 70 st:
Next row (RS): K decreasing - (17, 17, 21, -, -,
25) sts evenly (with k2togs) across row. 70 sts
rem.
Do this instead, to get to 60 st:
K1, (k2tog, k2) 3 times, (k2tog, k1) 20 times, (k2tog, k2) 3 times, k2tog
Then next row (WS): Purl all stitches to end. Break yarn and put 60 st on holder.
01-12-2018
Now for button bands:
Buttonholes are on the RIGHT side.
Buttons attached on the LEFT side.
Note that I totally fucked this up in the end because, even though I spent a long time thinking about it, I still got it wrong. Fuck. Don’t do that again Kristin.
I don’t like the icord button holes so I will make the left side band in accordance with: https://www.youtube.com/watch?v=L4_J1j_UDFY, thanks to AmongTallTrees.
Using PUK 3 st for every 4 along the button band length, I have 60st on each side. Decided to do P2K2 (as it appears on the outside of the garment) all the way up - no P3 at bottom and top, as instructed).
02-12-2018
I will be creating a “regular” centred buttonhole button band on the left side because, if you have any boobs to speak of - or even if you don’t - the icord, biased button band is likely going to pull. That drives me up a wall because it looks like bad fit even if it isn’t!
The front band (prior to adding the collar - and at the point that one begins to create the buttonholes) is 15” long.
I believe I’ll use a large snap at the collar if I opt to include a buttonhole at that latitude - either way, can’t make that buttonhole at this point because I’m not going to use the icord technique to make the bholes.
Worked the buttonholes on row 4 (rs row) on the purl bumps. I did my button band with purl 2 at the first 2 stitches from the hem so I’m going to position the lowest button hole on the second instance of p2, approx 1 inch from hem - but only on the RS - on the wrong side, the purl stitches (on which one works the hole) are knit stitches…
Right side of cardigan button band (has buttons, not holes): CO on RS, WS, RS, WS, RS, WS, BO on RS in pattern i.e. CO row, 5 rows, BO row
Left side of cardigan button band (has button holes): CO on WS, RS, WS, RS (buttonhole row), WS, RS, BO on WS, in pattern.
Thereafter, the remaining 4 button holes (I only have 5 of the buttons I’d like to use) are spaced ~3.5 inches apart, and those buttonholes are worked also on purl stitches.
03-12-2018
So I went pretty off-road in the end. I finished up all of the Heritage skein (save 1g and then another 3 g I used to start a sock prior to deciding to use the yarn for other purposes) and decided I’d had enough of this project which really hogs yarn, IMO.
Didn’t fold over the collar - and I made it 66 stitches in the end (k2p2 and k2 on last stitch as seen from the front side of the work). This leaves things a bit strange - at least pre-blocking - because I didn’t consider what treatment to give to the collar on the button band (interior) edges. I’m mulling whether this will block and look cool or whether I’ll have to come up with a fix. Who knows, I may learn icord after all (and I know it’s not difficult). I may also put an oversided clip between the two edges to hold closed. Or I may just leave it unhinged, because it’s not tall enough to do anything but rest against my breastbone.
I am currently blocking this and I feel it’s too squishy heavy - I wish I’d used 2 strands of fingering all the way through or one strand of worsted (and adjusted the gauge). This is just so gauge-massive for no good reason. But keep in mind my preferred yarn is fingering and my preferred needle size is a US3. I worked with, effectively, bulky gauge yarn and a US10 needle.
I am entirely unconvinced I’m going to like this when it’s done being blocked, for just about every reason. But my mother wants it so it should be ok.
Also, how many times have I been so excited by completing a sweater which really doesn’t appeal as much as I’d have liked, once blocked. So maybe this will be the inverse story.
Also, somehow I managed to make the buttonholes on the “incorrect” side (i.e. the side reserved for boys). That irritates me no end because I checked about a zillion times to make sure I’d got it right.
03-12-2018
On the plus side, I have achieved the size I set out to - my finished gauge is a bit larger than the smallest size (but not as large as the second size). I would not make this any larger and, according to my measurements, the designer would have recommended that I do the second size. Depending on how it dries (and I never block things of this dimension so I have no idea), I may wish I’d flat out made the smallest size - even with the gauge I achieved with this needle size and yarn.
05-12-2018
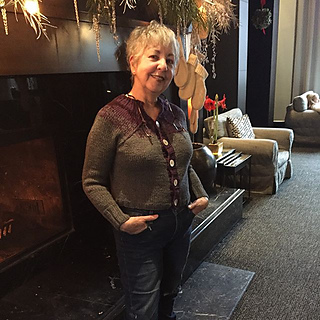
So, in the end, though the pattern is excellently-written, I really don’t love this and I’ll be giving it to my mum. IMO, the fit of this is challenging on some - though it does look great on the designer!
Some things that worked out quite well (and I’ll use again, no doubt):
- Marling before I ran out of the grey yarn so that it looks like the emerging plum fabric is intentional.
- Holding 3 strands of fingering yarn (to approximate 2 strands of robust sport) - wasn’t quite as thick but I was doing the button band and collar with the 3 strands of fingering so it works.
- I used the button tutorial recommended by someone else (can’t remember who at the moment) and it was quite comprehensive. I know how to attach buttons, but this was a nice refresher.
- I didn’t hem the collar. I was out of yarn (what made up my mind) but I also felt it was just going to be more unnecessary thickness. In addition to narrowing the neckline from 78 st to 66 stitches, I only did about 10 rows (will confirm) at the neckline to give a nice snugness around collarbones without the fussy funnel neck.
Things that didn’t work:
- This is a tricky fit given the gauge and proportions. I knew this going in but I wanted a proof of concept.
- Don’t lengthen! I did, only by an inch, and it’s too long. Admittedly I’m short waisted and 5’3” but I thought I’d need more depth for the boobs. I was wrong.
- I think this would look a lot better in a worsted gauge, even if one needs to resize the pattern. Or, at least, using one strand of Aran-weight or light bulky. Two strands of robust sport is home-ec-seeming.
- Even with the non-icord buttonbands, this thing pulls (and I backed the buttons with mini buttons for additional support). I could have sewn ribbon into the backs of the button bands for woven stability (I would do that were I to make this again), but the measurements should NOT be pulling based on size and the technique I used - I have an inch of positive ease going on! This is a suboptimal function of thick yarn knit in multi-strands plus cardigan plus boobs. It’s inevitable and it’s not very attractive. With the icord buttonholes, plus boobs, this thing would be a disaster.
- I don’t know how many times I reworked the left-leaning decreases on each side, but I could not achieve the gorgeously clean look re: shoulder shaping. Probably because I totally overthought it and I’m not in the most sharp head space right now. I mean, my recipient won’t even notice but it’s glaring to my eyes.
- I’ve got to figure out how to do the short rows on the back neck. I mean, it’s not a big issue but many women benefit from that alteration. For me it wasn’t a deal breaker but if you have any thoracic rounding, you’ll need them. The fact that this isn’t included as part of the sweater construction, in the instructions, is my only criticism of the pattern. It would improve the look for most and short rows aren’t intuitive to many knitters, so figuring it out is just another complexity.
Also, this is ALL about the finishing. If you aren’t a comfortable / competent finisher (wet-blocking with precision pinning and adequate time - 48 hoursish, firm, even-tensioned knitter of button bands, good at weaving in ends (if you’re using 18 balls of yarn like me), good at sewing buttons etc…, it’s going to look quite homemade. It’s got a very granola aspect to it that’s only mitigated by good finishing techniques. That’s why I don’t think this is a good sweater for a beginner - unless the beginner has done some sewing and is really technical by nature.


 KristinM100 notebook
  handspun
 queue
queue favorites
 friends
 needles & hooks
 library