-
Size I’ll Make: When blocked, and knitted on a US10.5 needle, my yarn is 5.5% smaller in stitch gauge (length) and 9.5% smaller in row gauge (circ / width) than instructed. Based on the measurements, I’ll work the circ / width in size B with length of size 2. I rarely make something oversized so I’m concerned not to make this too big. But to make it too fitted isn’t the style. Size B, at my gauge (and do like the fabric so I’m sticking with this gauge), will give me about 3” of positive ease, less than recommended - and this is about as large as I can go, regardless of my predilections, given the fixed amount of yarn that I have in stash. It should be enough but I’m not working with a lot of spare yardage, if any. But is there any point, really, if you’re not playing yarn chicken?
-
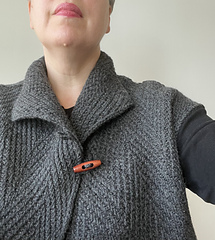
Make sure you have buttons for this… And snaps.
-
How I knitted the swatch: This is a 4st-pattern repeat with a selvedge edge with a post-blocked gauge of 18st and 36.5R in 4”. So, to get 4” of pattern “width” (not incl selvedge) - which is actually representative of pattern length, because this garment is knitted sideways - I will CO 20st plus 2 selvedge st, or 22 st total. Then, to get to 4” of “length” - which is actually rep of pattern width - I’ll knit at least 36R. Let’s call it 40 rows, or one 20R-repeat of the left-leaning pattern and one 20R-repeat of the right-leaning pattern. I worked the increases while doing this because I couldn’t easily figure out how to read the pattern in lieu of incl the incs.
-
About the icord cast on: At first I didn’t notice that the instructions guide you to knit an icord and then thereafter to pick up the stitches from it. I worked an icord CO that creates the stitches simultaneously instead. On balance, the all in one approach was prob not optimal (in addition to not beinginstructed) because, I’ve since read here that the method can impact the height of the stitches in the first row AND can make for an icord that isn’t at the same gauge as the pattern that follows (though, presumably, switching to a larger needle thereafter - as one does - would ameliorate this).
-
For future reference, to do the full-on icord cast on, I used these instructions: https://www.youtube.com/watch?v=ersj7LDrPrk&t=158s.
-
Thereafter, I opted to rework the cast on as instructed and, gotta say, I much prefer working the full-on/one stop icord cast on over the instructed “make an icord and then pick up stitches from it” version. I can’t say it looks any better to have done the “pick up stitches” version but my yarn is very dark and I don’t think longer, first-row stitches (potential issue when working the one-stop CO) would show. I was more concerned about flare, but I also didn’t experience noticeable flare with the all in one cast on. Point is, either can work, but I’d def use the smaller needle on the first row, before switching to the larger needle on the second row, if I were to work the one-stop version.
-
Knitting into the last stitch “below”: The instructions to knit into the stitch below (at end of rows) are unclear - esp when working in tweedy, dark grey yarn. First up, I assumed that, to achieve the “finished” edge, “(a) slip one purlwise” would be purlwise with yarn in back because it’s not indicated otherwise and isn’t that how it generally works when there’s no clarification? How one does this influences the edge of the fabric and how that edge presents. Having initially held the yarn in back, I was confused about whether I should pick up the horizontal side stitch nub on the outside of the lower row - which is created when the yarn is held in back and slipped purlwise OR into a “vertical” stitch below, which seems only to be possible when the yarn is slipped purlwise with tail held in front.
-
Finally, it started to become clear that, for a flat edge with an elongated stitch on the edge, I would need to hold the yarn in FRONT (though the instructions do not clarify this). But, another thing that makes this tricky is that, when you pick up the stitch below and k2tog with the last st on the current row, you have to pick up into the strand below that was actually knitted on the previous row. There are 2 strands to choose from and if you choose the one that was picked up already 2 rows below (vs the one that was knitted on the previous row), you’ll effectively be re-pulling up a stitch that was already pulled up once before. It’s really challenging to explain this. It’s also challenging to explain how to pick up the strand below without twisting the stitch.
-
What I did was work to the last stitch. Leave that last stitch on the left-hand needle. Use the right needle to pick up the last st from row below, from between the second last and last stitches. Ensure you choose the correct right-leg strand. Put that strand onto the left-hand needle, where the last stitch is, without twisting. K2tog both strands.
-
At first I wasn’t sure how much it really matters to work a long edge because my brain got confused and I thought I’d be finishing or seaming along these edges. But it totally matters because they represent the collar and hem of the garment, what with the sideways construction. So take the time to figure out how to do this, even if you have to knit a longer swatch.
-
The part where I wonder if I should change from size B to size A (to save yarn): I’m at the point where I need to do one more 10R-repeat on the front body (to get me to size B) OR stop now at size A. I would prefer to stick with the larger size but I’m worried about having enough yarn.
-
Having said this, it just occured to me that, given a 4” overlap of the front pieces (at the centre front), to get to the size 2 circumference, each front piece must be 13” wide. But, the back piece in size B is designed to be 22” wide. Effectively, the front takes more yarn than the back piece. So I should be able to make width B with the amount of yarn I have currently.
-
I estimate that finishing the edges and seam this garment will require about 10g of yarn but I didn’t weigh the yarn before starting so I can’t confirm.
-
About Back Body Cast On: Keep in mind that, optimally, you’ll have 2 interchangeable needles of the same material, 2 cables of the same length and two stoppers. I only have one Chiaogoo large cable (cuz I’ve never before worked with an CG interchangeable needle larger than 5mm - which I bought, along with a single cable, to make this project). As such, I needed to use one Knit Pro int needle / cable / stopper as well as the CG int. On the up side, having 2 diff needles and cable colours made it easier to figure out what was going on… Alas, the CG cable and needle do NOT come with stoppers so I left the second needle attached to the cable to keep the stitches from falling off.
-
While well-suited to this construction, working the provisional cast on (back body) was so freakin’ irritating. Took me almost 90 min, all in for a variety of reasons - tail was too short, multiple times, and then I managed to lose a stitch on my first knit row, so I had to rip that row back and add an additional stitch to the cast on. I got there eventually but def put aside time and be in a quiet mind-state / environment when you cast on for the back body.
-
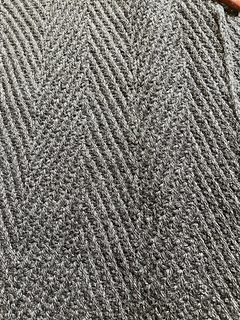
Note that, for the first 4 rows of each change in slant, it can be tricky to determine whether the pattern is being followed, just by looking. All rows take concentration, in this knit, but esp the first few rows after the herringbone slant changes direction.
-
Armscye depth / side seam length: So, having seamed everything exactly as instructed (and to the instructed proportions), and having finished the icord, the armhole is too long. This wouldn’t be an issue if the icord didn’t result in a slightly flare-y opening (which I’ve noted in other projects too).
-
Here are some ways that you might avoid or ameliorate this: If I were to make this again, I would make the side seams about an inch longer (which would make the armhole smaller). I’d probably graft the side an additional 8 stitches (making the armscye that many fewer stitches in circumference). I still think there may be inherent structural things going on with the flare of the icord because even knitted on a needle one size smaller than the main needle, and even though it’s only 2 stitches wide, it has a lot of profile in a way that makes it flare. I steamed the fabric but it didn’t fix the problem and I doubt wet blocking would either. To mitigate flare, I would also go down an extra needle size (to a US9 / 5.5mm).
-
Since I didn’t intend to undo all of the icord to re-seam and then redo the icord, I pick stitched up the side seam (over the icord at the base of the armhole) to lengthen the side seam by one inch. Pulling in the icord at that latitude shortened the armhole and significantly decreased the flare. The armholes are very open so this alteration didn’t make anything too small. Keep in mind that, depending on where the arm opening hits on your upper arm, this may work better or less well. I like both looks conceptually (very open armhole vs more fitted) but I feel that the shorter armhole looks better from the perspective of the edging. Mind you, I can undo the side seams - and redo them - very easily so I can decide what I prefer.
-
I used snaps and toggle buttons and I really don’t think the snaps are necessary, given that my fabric is quite sturdy and light-weight for it’s gauge. And the snaps, which are metal, may actually weigh down the fabric over the course of time (though likely not, they’re not that heavy and the fabric is firm). Since I actually like the look of this garment open (surprising), I may remove the snaps which are visible when the garment is unbuttoned.
-
The techniques are beautifully thought out and the design is chic. Hats off to the designer for finding a version of herringbone stitch that really does look woven.
-
This is not a simple project. It’s quite well-explained, for the most part but, by nature of the (very cool) design, it’s fussy knitting: The cast ons are involved, but worth the effort, and the edge-stitch technique is tricky to interpret. The stitch pattern is complex and will not forgive any errors. So if you lose focus, you may find yourself ripping back rows. Just view it as part of the process, and don’t knit this when tired or tipsy.
-
I think it’s at its most advanced in terms of finishing. This is a seamed garment and it’s textured to the edges. To make the finished object look good, one is well served to be comfortable with a number of hand-finishing techiques. These techniques tend to improve with experience so I wouldn’t make this my first high-finish garment. I sense that I spent 20% of the total time I worked on this project on the finishing (shoulder seaming, side body seaming, icord edging of the armholes, attaching buttons and snaps, weaving in ends and steaming the final fabric). It had a sewing vibe - which I like.
-
I love that this can be worn as a cardigan over shirts or as a light-coat/jacket overlayer.
-
Based on my own situation, I would advise against using somewhat fuzzy and/or dark yarn because this stitch pattern is already hard to read in the fabric. My yarn is a smooth-ish, round four-ply with great stitch definition but it is a bit splitty, can be grabby, and one must pay attention. Mind you, even in a dark charcoal (with nuanced undertones), the fabric is beautiful. But I would probably make this in a lighter colour palette were I to knit it again.
-
While the pattern is very clear, the schematic could be better inasmuch as it doesn’t provide measurements for the depth of the collar or the side seam length (just the full length and the armscye length). It also doesn’t clarify the width of the shoulder segments (at least not without doing the math). And given that this is knitted sideways, row gauge dictates length and stitch gauge dictates width.
-
I rarely work on needles above size US8/5mm because it can be uncomfortable for my hands. This project is no exception but the intrigue of seeing the pattern come together was motivating. In addition to the needle size, the herringbone stitch pattern can be hard on the hands.
-
Cost of Yarn: $93.00 CAN
-
About the yarn: I totally love it. I didn’t know how I’d feel about it and I did not love knitting with it on US 10-10.5 needles. But that says more about the needle sizes than the yarn. Admittedly, this is a worsted/aran-weight, something I don’t use often. I may be entering my structural / more robust knits phase, in which case this yarn will definitely be making more appearances. I’d also buy it in the thinner-weight Pernilla, which is a 3-ply heavy fingering (vs Peruvian’s 4-ply light aran). It blocks beautifully and makes for an water-resistant outer-garment. I can tell that it will repel rain and cold very well. My only complaint is that every ball was underweight by about 1.5g, the weight of the ballband. Overall, 8 balls were 11g short and I don’t overbuy yarn.
-
In the end I had more than enough yarn and you have to love a garment that takes a mere 750y (in the size that I made). I probably used 2g of the (underweight) last ball of yarn.
It’s really hard to figure this out in this stitch pattern on tweedy dark grey yarn. But it looks like…
17st and 37.5R in 4” - Note that this preblocked yarn was a bit more open then anticipated, given that the fabric needs to hold its own to have that woven look. I hope that it blooms without getting larger than 36.5R in 4” and/or provides a fabric that I like. At that point, I can decide whether to knit size A or B for circumference.
So, on blocking, this yarn shrinks 5.5% in stitch gauge (this creates the length of the garment) and 9.5% in row gauge (this creates the width / circumference of the garment when knitting sideways). I’m going to knit the B…


 KristinM100 notebook
  handspun
 queue
queue favorites
 friends
 needles & hooks
 library