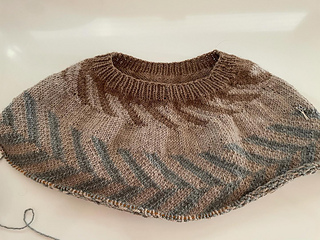
I gave this a lot of attention but opted to frog. Yoked sweaters don’t work when they are fitted (and I tried to make my version more fitted than the pattern directed). It inhibited mobility. I’m not really feeling an oversize worsted sweater. That’s a lot of weight… so I’ll find another pattern to with which to use this yarn.
Given colourwork, I’ve decided to work with the US 7 instead of 6.
US 6: Preblocked 21.5st x 32R in 4”
US6: Post-blocked: 20.5st x 32R in 4”
US 7: Preblocked 20.5 st x 29R in 4”
US 7: Preblocked 19.5st x 29R in 4”
See this project page for way to use 3 colours: https://www.ravelry.com/projects/waywardneuron/kuffel. She made the smallest size also and used her yarns so interestingly.
Pattern calls for:
C 1: 940 y
C2: 470 y
I’m going to break up C1 into 2 phases, and based on yarn quantity used by Wayward Neuron (below), but note, I may use my 3 yarns differently.
C1: 600 - Camel
C2: 400 - Light Grey
C3: 200 - Straw OR Charcoal
06-02-2021
How to Use Needles in this project:
Sleeves: When you get to the sleeves, use the US 7 16 inch (if it works). Otherwise, magic loop on a 32” or 40” cable using the longer interchangeables.
Also, use the short interchangeables to make a US5 16” when you get to the ribbing on the wrists - presuming that this size works.
Neckline:When you work the neckline, use 40” US5 needles via magic loop - or I guess you could use the short interchangeables if that works…
Ribbed Hem: Use US5 40” or 32” cable for ribbing.
07-02-2021
OK - I should have known it was going to be a PITA changing the colourwork AND the neckband aspects of this pattern and, after ripping this back 8 times, here’s what I’ve figured out:
-
Based on other knitters I decided that the neckband would be way too large, even in the XS, so I cut it back from 132st to 102 st.
-
Since I’ve opted to do the xs without any other sizing changes, I needed to inc 30 st on the plain row after the ribbing and before the short rows start (Section A). That’s a special kind of irritating given st. numbers and division. See red book for the visual on where to insert the inc stitches (either 3 or 4 rows between each).
-
I decided not to do the tubular cast on, not because I don’t like it, but because I don’t want too much stretch in the neck (given that many have confirmed that it’s drafted large for size and I have a narrow frame). I tried to provisionally cast on a couple of times (aka 2 hrs!) but given that one only has 1 row to work before short row A, and that this row and the short rows would be in another colour, given how I’m changing the colourwork, it wasn’t easy to grasp. Add that to 30 stitches of increases and that first couple of rows was pretty nightmarish to control, esp if you add in a crochet chain holding the provisionally cast on stitches. In the end, I opted for german twisted cast on - my go to. With reduction of stitches, this should work…
Here’s how I’m going to use colours (see diagram) - borrowing heavily from waywardneuron’s version (which is so clever):
Neckband - C1 Camel continue this colour until after the short row A section or the initial contrast colour (C2 in the pattern) will start after a thin stripe of C3 on the back neck due to short rows preceding colourwork
Colourwork Section A
I’ll do the white section of the chart using my C1 Camel and the blue section of the chart using my C3 Straw. I’ll continue with C3 through Short Row Sections B and C and the inc rounds.
When working this next section: Consider when to do the sep of body from yoke - it can be somewhere within Colourwork Section B OR at the beginning of Colourwork Section C, or somewhere within Section C. You’ll need to determine whether the yoke is long enough, hard to predict given short rows… I suspect it may be before CW 3 starts - maybe in Section B after the colourwork
Colourwork Section B
Use C2 Grey in the white sections of the chart B and use C3 Straw in the blue sections of the chart. After colourwork ends, continue with C2 Grey for Short Rows Section D, increase round, Section E, final increase round.
Colourwork Section C:
Use my C1 Camel in the white section and C2 in the blue section of the chart (make sure that C1 Camel is the FOREGROUND of the chart and C2 Grey is the BACKGROUND). It’s difficult to envision this before getting to that section so if I’ve got it wrong with white/blue remember foreground/background. After the chart ends, you’ll continue with C1 Camel to do the Short Row Section F and then continue per pattern instructions to desired length, BO.
Sleeves
Figure out what this means in practice: The next section requires you to work the colourwork pattern as established on previous rnds of the yoke while simultaneously working instructions for shaping. Continue in patt to last row of Chart C following patt between red lines in chart, omitting the selvage sts. The sleeves are shaped from the center of the underarm, which means the beginning point of the patt will change from round to round.
Given what others have suggested, I may opt not to do the shaping within the colour work section of the sleeves
10-02-2021
So having finished the 7 straight rows after cw chart A, I’ve ripped back again - this time to the end of the colourwork section. I suspected that WT short rows would look crappy and they did. I really don’t know why anyone designs with them (unless it’s a garter project) - German short rows are neater every time (and not just for me!). So I had to remind myself how to turn WT to GSW (I hate doing stuff like this). But hopefully now it’s sorted and I can enjoy the knit.
Also, I’ve decided - based on what I’ve read from others, and given that I don’t see any reason for 6 segments of short rows, each being 4 “rows” long. - to change that up too. I don’t want the back to be longer than the front - esp as I have boobs to take up space on the front body. So I’ve done the first 2 short row sections (A and B) for the 4 “rows”, as instructed, and I’ll do the remaining 3 (C, D, E) using only 2 rows - as certain other knitters have done. I don’t know if I’ll do the final - F…
12-02-2021
OK, the fit on this is very good on finishing colour work chart B - my shoulders are rather narrow so I often make the smallest size when knitting shoulders grading to a larger size in the bust (cuz my boobs are proportionately large). This is one of those times that a pattern really works for my proportions. Note that I more or less got gauge (colour work is always a bit tricky to predict in the final sweater).
For starters, I don’t want a garment with 14” of ease. I’m short and small and that would overwhelm me (as would a neckline as wide as recommended for this pattern in the smallest size). For me - 3-5” of positive ease is the max I’m really comfortable with. Fortunately, this pattern has more than enough ease in the smallest size for my boobs - so no need to resize in the zone of a pattern wherein sizing is often an issue for me.
By making the neckline much smaller than size 1 instructs, and then quickly increasing to size 1, the neck shaping comes in close and that works for me. I also have a very short armscye - like 6.75” in depth. And I’m not sure I want a swancho (though I like that look). Certain others who have made this indicate that they couldn’t separate for the sleeves sooner because the shoulders were too tight at the depth of the armscye when they wanted to remove the sleeves.
Presuming that’s the case (and I haven’t thought it through) - I’m super lucky with this pattern because this fits me well in the torso + arm circumference at the stitch count that directly precedes/includes cw chart B - so I will have extra options when it comes to a) how “swoncho” this is and b) how oversized, overall, it will be.
Option I’ve Decided On: Separate for sleeves after the next increase round (which would bring me to 288 st at the point that I’d separate). What this means is that I’d have some more room in the arms (my arms are fairly narrow so 55 + 5CO stitches will work size-wise at my upper arm) before separating. It also means that I wouldn’t have the arm circumference to feed into the instructions anymore so I’d have to slightly alter how I’d do the final increase round for the torso, to get myself to the correct stitch count BEFORE starting cw chart C - which in size 1 is 210 st.
Specifically, what I’ll do is:
- 240 st, do modified short row section D
- Do increase round (288st)
- Work 1 round plain and set markers up in the correct spot for removing sleeves.
- Do 1 round to remove sleeves (55 st). At this point, I’ll have 188st on the body because I will have cast on 10 stitches under arms, 5 each under arm, plus 178
- Do modified short row section E
- Do increase round (Need to inc 22 st to get from starting point of 188st on body (88 B, 90 F 5 underarm x 2), once the sleeves are removed, to 210 st, the necessary count when starting cw chart C. That’s 1 inc every 7 or 8 st. on the body - 10 on back, 12 on front - leave the under arm stitches out of the count for increasing…) (210 st)
Note that I fucked this up and somehow thought I needed to get to 200 st, not 210 - so I did a bunch of increases to decrease - total stupidity. But I’m not ripping back yet again (already done this 3 times today) to increase by 10 st. I’ll just have a smaller circumference by 2 inches and if I feel I need to increase, I’ll do it after cw chart C.
- Work 5 rounds plain (to make up for those you didn’t work higher up)
At this point, before moving onto cw Chart C, put on the garment and confirm that you like where the next chart would start - if it’s over the boobs, add more rows of depth till you get where you want it to hit. Pay attention to number of rows worked because you’ll need that info when working the sleeves… Update - I won’t have enough of my C2 (grey) yarn if I don’t move onto cw chart C so I hope that it works as is…
14-02-2021
How many ways to eff up???? I used 2 circulars on a row when I wanted to try on the sweater - one US 7 (my working size) and one US6 (it was in the bag). Then I proceeded to continue working with the US 6???? Whatevs, I actually couldn’t decide which needle I preferred. I just wish that I hadn’t done the preceding single colour section in US7, given how many increase/decrease issues I had to resolve over just a few rows in that section. I really hope it blocks out cuz the smocky look going on now is not appealing…
Also, at the point that I finished cw Chart C, I have 37g of the grey remaining for sleeves (18g per sleeve for the segment that includes that colourwork.


 KristinM100 notebook
  handspun
 queue
queue favorites
 friends
 needles & hooks
 library