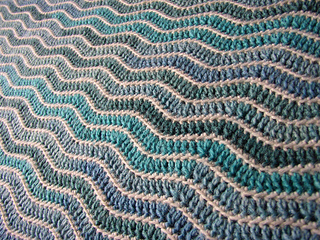
The pattern of this blanket is mainly based on Lucy’s neat ripple pattern.
The idea of mixing these two yarns comes from Louise’s Multnomad. Like her, I did not like having two consecutive lagoon rows. I chose to separate them with “thin” white rows, the way is done in Vortex throw & pillow.
My pattern is the following:
Alternate a row of ripple (lagoon yarn) and a row of single crochet (white yarn); the right side is facing throughout (never turn your work).
For the ripple rows, crochet in back loops only.
When I start a ripple row, I chain 3 instead of making a double crochet stitch in the first single crochet of the previous row.
When I start a single crochet row, I chain 1 (never used) and I make a single crochet in the third chain of the previous ripple row first stitch.
Tips: weave in the ends as you go, otherwise it is a nightmare (I very painfully learned it when I had more than 400 ends to weave in when the blanket was finished).
My chainless ripple foundation adapted to Lucy’s ripple pattern
I needed to start with the ripple row, thus with the variegated yarn. To avoid having different colors between the foundation chain and the first ripple row, I chose to use a chainless ripple foundation technique, adapted to Lucy’s pattern. To understand how to crochet a foundation stitch, I watched this crystal clear video about foundation single crochet.
Foundation double crochet (fdc)
- yarn over,
- insert hook in 1st chain,
- yarn over, pull through the 1st chain,
- YARN OVER, PULL THROUGH ONE LOOP (to create THE chain stitch)
- yarn over, pull through 2 loops
- yarn over, pull though 2 loops
Two foundation double crochet together (2fdctog)
- fdc (but do not do the last yarn over; TWO LOOPS stay on the hook)
- fdc (do the last yarn over and pull through the THREE LOOPS)
Instructions
dc: double crochet
fdc: foundation double crochet
ch: chain
2fdctog: two fdc together
4 chain stitches, dc in the 1st ch,
fdc in the same ch, 3fdc,
(µ) 2fdctog decrease, 2fdctog decrease,
4 fdc,
1 fdc (named F1), 1 dc in ch of F1, 1 fdc (named F2) in ch of F1, 1dc in ch of F2,
fdc in ch of F2, 3fdc,
repeat at (µ)
To help understand this technique, you can watch this video.
I have created 18 ripples/“valleys” to obtain 1 meter wide (it is equivalent to 18 by 14 + 3 chain stitches).
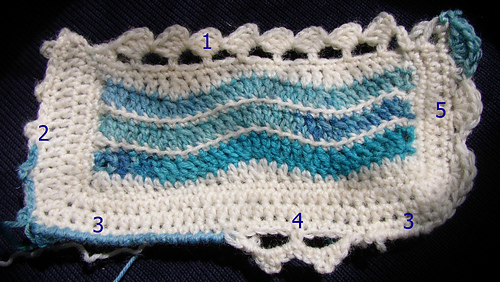
Edging
I chose to terminate the blanket with an edging, a bit as crochet with Raymond did. The blanket looks better and the sides of the ripples are a bit “consolidated”. I hesitated between different edging as shown on the fourth picture.
The five different edging used on the sample are the followings:
- the olé-olé blanket edging from le monde de sucrette
- the picot edging from crochet with Raymond
- a reverse single crochet/crab stitch edging (sc from left to right: video)
- the stripy blanket edging from le monde de sucrette
- a shell edging (sc, skip 2sc, 5 dc, skip 2 sc - on the second picture, I used sc, skip 2sc, 2dc, 1ch, 2dc, 1ch, 2dc, skip 2sc and in the corner 2dc, 1ch, 2dc, 1ch, 2dc, 1ch, 2dc)
First, I have filled/flatten the ripples (see below) and, on the sides, crochet two single crochet stitches by ripple row and one by single crochet row. I chose to crochet three single crochet stitches in the corner (some people use sc, ch, sc).
Then, crochet another row of single crochet stitches while harmoniously increasing (or decreasing), if needed, the number of stitches depending on the chosen edging. For example, with the shell edging, the number of stitches on each side must be a multiple of five and a shell should be in each corner (thus you need to be careful where you start the edging).
After many hesitations, I chose to keep the blanket simple with the reverse single crochet edging (no need to calculate the number of stitches). If the blanket were mine, I would chose the olé-olé edging.
To “flatten”/fill in the ripple
sc: single crochet
hdc: half double crochet
dc: double crochet
2dctog: 2 dc together
For the ripple at the top of the work:
3 sc in the corner stitch, 1 sc,
(µ) 2 hdc, 2 dc, 2dctog, 2 dc, 2 hdc, 4 sc repeat at (µ)
2 hdc, 2 dc, 2dctog, 2 dc, 2 hdc, 1 sc, 3 sc in the other corner
For the ripple at the bottom of the work:
(1 sc, 1 dc, first stitch of a 2dctog) in the corner stitch, second stitch of the 2dctog,
(&) 2 dc, 2 hdc, 4 ms, 2 hdc, 2 dc, 2dctog, repeat at (&)
2 dc, 2 hdc, 4 ms, 2 hdc, 2 dc, first stitch of a 2dctog, in the corner stitch (second stitch of the 2dctog, dc, 1sc)
There is another way to do it, as dmd25 pointed it out. Have a look here. The only difference comes from the “valley” where one “method” uses two triple crochet stitches whereas the other a 2dctog stitch.
Some figures
width: 99 cm without the edging // 18 ripples or “valleys” (252+3 chain stitches)
1 skein = 26 single crochet rows = 12 ripple rows.
one single crochet row = 20 minutes (I do not crochet fast)
one ripple crochet row = 40 minutes
1 row of ripple + 1 row of single crochet = 1 cm


 carine07 notebook
  handspun
 queue
queue favorites
 friends
 needles & hooks
 library