This would be really cute as a short-sleeved top. May need to make one out of a summery yarn. (See WIP photo before sleeves were started.)
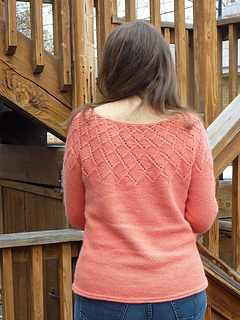
The way the yoke pattern incorporates the decreases is ingenious.
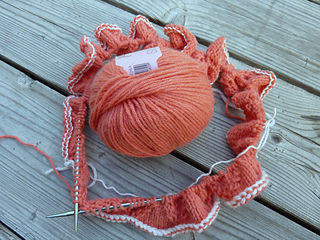
Started with a provisional cast-on and made the yoke first. It was a little bigger than most of my sweaters, but I figured it would be fine. But if I knit it again, I’ll take out one repeat.
Put the provisional stitches on a spare needle, then started the body and sleeves as follows:
- With main needle and the working yarn, cast on 4 stitches.
- Knit 88 stitches from the spare needle for the back.
- Put the next 55 stitches on waste yarn for the right sleeve.
- With the working yarn, cast on 4 sts onto the main needle. Place a marker for the side “seam”, then cast on another 4 sts.
- Knit 88 stitches from the spare needle for the front.
- Put the next 55 stitches on waste yarn for the left sleeve.
- With the working yarn and main needle, cast on 4 sts. Place a marker for the end of round and side “seam”.
All body stitches should now be on the main needle, and the stitches for the two sleeves should be on waste yarn. (Total of 8 sts for the underarm, not 10, since there is no seam.)
Short rows: Work across the back to 10 stitches past the next marker, w&t. Purl back to 10 stitches past the other marker, w&t. Continue the short rows, wrapping the stitch prior to the previously wrapped stitch until 4 stitches have been wrapped on each side. Then work in the round, working the wraps together with their wrapped stitches on the first round.
For the body:
Worked down from the provisional cast-on, with phony seams at each side.
I had the body worked down to the hem, with “princess seam” waist shaping on the front and back. Although it looked good in the front, I didn’t like how it looked in the back - there were just too many stitches, and the back puffed out above the waist shaping. Ripped the entire body back to the yoke. Decreased 6 stitches along the back by doing a K2tog at each “point” of the pattern, but left the front alone.
2nd time: Worked some bust darts between the bust and the waist on the front only. No other waist shaping. Much happier. Made the top really long. I was going to do a turned hem, so I worked 2 purl rounds, then an inch of stockinette for a facing, decreasing 10% of stitches on the first round of the hem. Rather than hemming with the live stitches, which I usually do, I cast off loosely. Then I decided I liked the way the facing rolled up to the purl ridges, so I’ll probably leave it that way.
For the sleeves, put the stitches from the waste yarn onto the needle, and pick up 8 stitches from the underarm, placing a marker at the center of the 8 underarm stitches. Work sleeve down in the round, with a phony seam. Instead of the bell sleeves, just decreased every inch for tapered sleeves. Finished the same way as the bottom hem.
Geranium leaves: The name “phyllo” comes from phyllotaxis, or the arrangement of leaves on the stem of a plant. The yarn colorway is Geranium.
10-26-2012 Geranium Leaves (from my old blog)
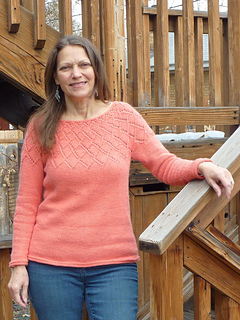
There has been a bag of RYC Cashcotton DK in the colorway “Geranium” in my stash for years, and I finally decided it’s time to use it or lose it. For such a bright color, I figured a pullover would be a better choice than a cardigan.
Browsing through the patterns on Ravelry that I’ve queued or favorited, I thought that the Phyllo Yoked Pullover would be a good match.
The pattern is written to knit the front, back, and sleeves bottom up, then seam them all together and work the yoke in the round. Since I wasn’t entirely sure about the sizing of the yoke or even if I’d really like the sweater in this yarn, I decided to start with the yoke. If I like it, I’ll pick up the stitches for the body and sleeves and work them downward.
The chart for the yoke is a little tricky, because you work the last stitch or two of a round with the first stitch or two of the next round, depending on where you are in the chart. I got a little confused at times, but just relied on reading the knitting to keep on track. But then I came to a bit of a change in the pattern, and wasn’t sure which stitches needed to be knit together to start the next round. I thought it might help to take a good look at the closeup of the yoke in the pattern photo in the book.
I spent quite a while squinting at the photo and my knitting, and finally figured out what to do. It wasn’t until after I’d been looking back and forth between the photo and my knitting before I realized that the yarn I’m using is almost exactly the same color as the yarn in the pattern photo. Yes, I’m slow sometimes.
And my project name? The designer, Norah Gaughan, said the ‘phyllo’ was for phyllotaxis, which is the arrangement of leaves on a stem. Geranium, of course, is the color.
11-10-2012 Ups and Downs (from my old blog)
For all the knitting I’ve done on it, the Phyllo Yoked Sweater should have been done by now. (Looks kinda cute as a short-sleeved top, doesn’t it? I think I might have to make another one of these for summer.)
After knitting the yoke, I picked up the stitches and worked down to the hem, doing some waist shaping on the front and back sections a quarter of the way in from each side (like Princess seams). It looked great from the front, but there was too much fabric across the back, and it sort of ballooned out above the waist shaping, making me look a bit like the Hunchback of Notre Dame. Part of the problem was the yoke being a little too large, and part was that I had done 6 sets of short rows to mimic the shaping in the pattern instructions, and it was too much. I realized I was never going to be happy with it the way it was.
One solution would have been to start over completely, reducing the yoke by one repeat of the stitch pattern. I wasn’t too crazy about that idea, so instead I just ripped out the entire body back to the provisional cast-on of the yoke, and restarted it. On the first round, I decreased 6 stitches across the back by doing a k2tog at each bottom point of the diamonds in the stitch pattern. Then I only did 4 sets of short rows. Rather than making it as fitted as I did the first time, I just 3 sets of decreases on the front only, between the bust and the waist (working them the same way I did the first time, like Princess seams). That made the stitch count for the front and back the same by the time I got to the waist, and I just worked straight down from there with no additional shaping.
The slightly looser fit worked much better with the pattern. But I still wasn’t done with the reknitting. After knitting and trying it on every inch or so, I finally decided that I just needed one more inch of length. But after that last inch, it seemed too long, so I ripped it back out an inch and knitted the hem. I decided on making a turned hem with a picot edge. After finishing the whole thing and hemming up the last row of live stitches, I tried it on again, only to decide that it was TOO SHORT. Huh? How did that happen? Not only that, but I decided it would look better even longer than I’d planned in the first place, so I wanted to add 2″. Blech. I unpicked the hem seam, ripped it back to my turning rows, and knit another 2″. I wasn’t sure I liked the picot edge, so this time I just worked two purl rounds as a turning ridge, then another inch in stockinette for the hem facing. Rather than hemming up the live stitches, I cast off loosely. Then I tried it on again. Can you guess what’s coming? Now it seemed TOO LONG. Sigh. And adding to the length issue, it turned out that I really liked the way the hem facing rolled up to the garter ridges that were supposed to be turning ridges. Normally I don’t like rolled hems (which is what the pattern calls for), but the garter ridges stopped the hem from curling too much, and it sort of just looked like some reverse stockinette welts at the bottom hem.
So what to do? I decided to just wait and decide on the hem later, after the sleeves are done and sweater has been blocked. I did want it to be kind of a long sweater, so as long as it doesn’t grow too much in the blocking, it will be fine. And if it’s not, then I’ll just rip the hem back and make it an inch shorter. Which means, of course, that I’d be making it the same length I did in the first place.
Oh well. A snowy weekend is a good excuse for doing a lot of knitting.
11-16-2012 (from my old blog)
Done!
Well, unless I decide to undo the bindoff at the neck to decrease a few stitches and make the neckline a wee bit smaller.
I made the smallest size, knowing there would still be some positive ease. But I wanted something that was sort of loose and cozy. If I make another one (especially if I make a short-sleeved version for summer), I’ll work one less pattern repeat in the yoke.
Modifications: Pretty much everything besides the yoke. I started with a provisional cast-on and worked the yoke as per the pattern. Then I picked up the stitches for the body and worked it down in the round, making it smaller, longer, and doing some waist shaping. For the sleeves, I picked up the stitches and knit the sleeves down from the top, making plain tapered sleeves rather than bell sleeves. All hems were finished with two rounds of reverse stockinette, then 6 rounds of stockinette, and bound off loosely. The ending stockinette rolls up to the reverse stockinette, looking a bit like two garter stitch ridges.


 CabledSheep notebook
  handspun
 queue
queue favorites
 friends
 needles & hooks
 library