i think this would be a great wrap for my daughter who will need something to breastfeed the new baby under and still stay warm.
i am using the size yarn and hook that the pattern calls for but am concerned that this may end up way too big for my petite daughter. plus the worsted weight yarn makes for a fairly thick and not very drapable fabric. (you can tell i wrote this comment when i started. now i am worried that it wont be long enough when i give it to her)
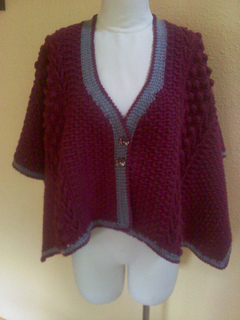
i highly recommend that you do this in a VERY soft yarn. these acrylic yarns make for a very stiff garment. so if you use acrylic then i recommend steaming.
to lengthen this wrap so that it would fit a size medium to large (or even to look like it does in the pattern picture), you need to add to the bottom of both the front and back of the wrap. plus whatever you added to both sides would have to be added into the front piece. depending on how tall you are, you could lengthen this wrap anywhere from 8-24 additional stitches in the front and back.
plus the neckline should be lengthened. if you have lengthened the wrap on the front and the back then i would suggest dropping the two front pieces down between 8-16 stitches - depending on how much you have lengthened it.
you need to lengthen the wrap in multiples of 8 to compensate for the herringbone stitch and the bobble stitch.
this pattern is VERY difficult to follow when you get to joining the left front section. the pattern doesnt really explain. on LEFT SIDE: after you chain 32 then you are going to work your alternating FP and BP into the front left so that it is joined to the piece. Be careful that you have the right side and wrong side matched to your main body piece as you join. this is the part of the instruction that is left up to the crocheter to figure out on her own.
Another thing that is VERY disappointing is that the picture on the pattern shows a MUCH MUCH longer wrap then the actual pattern once its finished. my project is exactly to gauge and i will be lucky if it comes down to my daughter’s waist. i have looked at other pictures of completed projects and they also appear to turn out MUCH shorter then the picture on the pattern. VERY DISAPPOINTING!!!
The picture in the original pattern also shows the wrap falling to below her elbows and to several inches down her thighs… the actual completed project isnt going to even come close to that size.
i didnt stand back far enough in my pictures to show that it LOOKS short even on the mannican. kind of looks like what we used to call crop tops - those shirts that stopped at the waist but werent fitted.
i think if this had been longer, i would have been soooo much happier with it. i am working on getting it drapier - hoping that will help so that it doesnt look like you are wearing a stiff blanket. i have been steam ironing it from the wrong side with a very light hand. so it is getting mostly steam and spread out by fingers.
yep - steaming the yarn so that it drapes has helped this TREMENDOUSLY. its still a tad short i think but the drape helps it to hang a bit longer. it doesnt look so much like a stiff blanket … reminding me of the old mexican gun slingers on tv …. wouldnt my daughter love that ?????
the finished dimensions as listed by the pattern dont make a lot of sense if your gauge is correct.
i have worked out how you would lengthen this pattern for someone and so i am sharing that information here.
Pattern Lengthening:
the only way to lengthen this is to lengthen it from the front and back on the ends. when you are working this … the way to lengthen it is to make MORE chains on your foundation row. the foundation row is actually the length that goes from back to front across the arm on one side.
so when you get to the point where it says mark ch 74 for the shoulder thats not going to be true. but realize that the original chain was 149. so 149 - 74 = 75. so you can see that it was one stitch in from halfway.
so how many chains do you add to lengthen this. there are three distinct stitches in this pattern. the seed stitch is a 2 stitch repeat plus the turning stitch on each end so that is easy. the ‘arrow look stitch’ is a 4 stitch repeat (see rows 20 and 21) plus the end stitches. the bobble stitch is a 4 stitch repeat (see row 23 of instructions) plus the end stitches.
so what i get for her foundation chain is 37 * 4 + 1 = 149.
for the neck shaping i would follow her instructions exactly because the length of the front will work out in the end of it. you will need to count to ‘add on’ the left front.
on the right front it says “46 stitches” in row 1. so when you are working yours, count how many stitches you worked in your row 1 of the right side and remember that so you know how many to do in the left front to match.


 PiggyWiggy96 notebook
  handspun
 queue
queue favorites
 friends
 needles & hooks
 library